NB: I have included links to items that you can purchase from Amazon in the post. If you buy using this link I will receive a small commission at no extra cost to you.
You can get started with bread making with just a few essential items of equipment. You might find that you have these in your kitchen already. If you would prefer to watch my video on this subject you will find it at the bottom of this article.
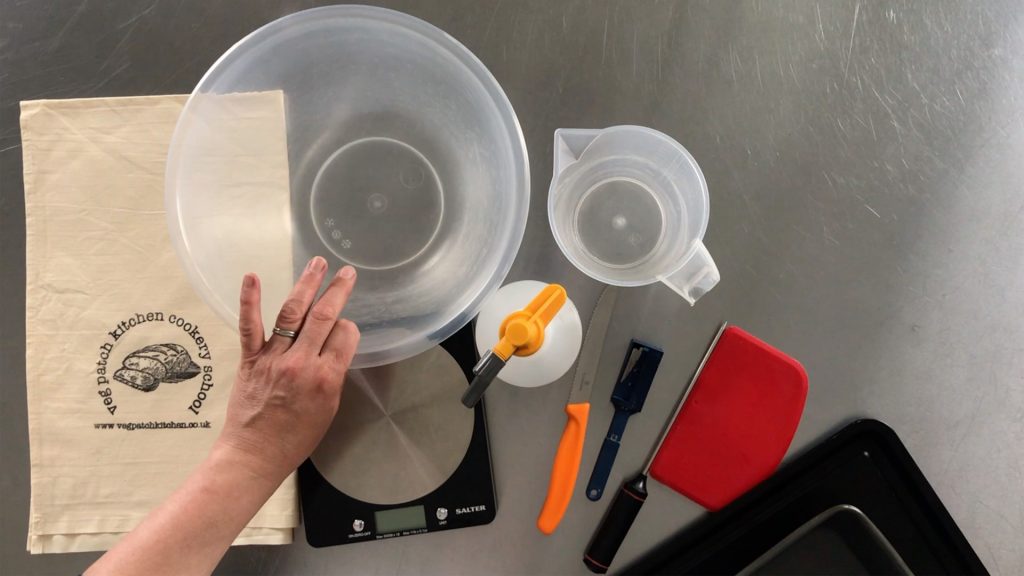
Essential equipment for making bread
As a minimum you will need:
- A set of scales to weigh your ingredients. I recommend electronic scales rather than a balance scale as you can weigh as little as 1g on the electronic scale. But if all you have are balance scales then you can use a teaspoon to judge your salt and yeast. 1level teaspoon = 5g. Electronic scales are between £10-15. After using several brands I find that Salter are the most reliable.
- A bowl. I use a plastic bowl that costs just a couple of pound from the supermarket. I use these because they are lightweight and transparent which makes seeing how well the dough is fermenting really easy. You can use any large bowl that you may already have.
- A baking tray. Again I use baking trays that cost very little from the supermarket. If you can afford to I suggest getting a really good heavy base tray that you can preheat in the oven. This will improve your oven’s ability to retain heat as you open the door to load your loaf and a loaf will benefit from having a hot surface underneath it even if it is in a tin.
Those are your three essential items for making a good loaf.
Non-essential equipment but great to have
Additional items that come in handy include:
- Really good oven gloves. I think that these might be more suited to the essential list if you want to prevent yourself from having baker’s arms. You can always tell a cook or baker from the burn scars running up their forearms. I use Matfer’s baker mitts, which are fantastic except you can’t wash them easily and they are an expensive purchase. I recently bought myself a pair of BHQ oven gloves which are doing a good job, but don’t come as far up my arm so I just have to make sure that I am being careful. I am notorious for catching my upper arm on the shelf above or the oven walls.
- Loaf tin. If you want a sandwich loaf then you will need one of these. Buy a heavy one if you can and oil it before each use. Try not to wash it if you can avoid it, just wipe it with kitchen towel after each use. This will help season it, even it advertises itself as non-stick. Don’t use any tools to get a stuck loaf out. If a loaf gets stuck, place it upside down on cooling rack and with luck as it begins to cool it will retract and come out easily.
- Spray mister. When you put your loaf in the oven you will need to steam the oven so that the crust stays most whilst the trapped carbon dioxide expands and causes the loaf to have oven spring. I find that spraying the oven walls and sides (avoiding the light and glass door) does a great job of this whilst avoiding potential burns through handling hot water and steam bursts. You should be able to pick one up from a DIY store or supermarket for a couple of pound. I recently bought a pressurised mister that I pump before use that works really well and produces plenty of steam
- A plastic scraper. I didn’t have one of these until I got to the age of 40. Now I look back on all those wasted years… but seriously, these are fantastic tools to have in the kitchen. They will get the stickiest of doughs out of bowls, they will help you to shape your bread, they clear down a sticky side in no time. You can use them to get the hardened bits of dough out of unwashed bowls or off the side of your sink. They are great for spreading the icing on a cake. They will help when grouting the bathroom. They clear the ice off the car windscreen. Get one quick and then lament all of the years you spent without one.
- A sharp knife or baker’s razor. This should probably also be the essential equipment because if you are baking a loaf without popping it into a loaf tin you will need to slash or score your loaf so that when it has oven spring it bursts where you want it to burst rather than at its weakest point. A baker’s razor is a bit of an investment but if you are a regular bread maker you will be glad of it. I use a Mure & Peyrot Bordelaise which has a safety cap. An important feature for me as I don’t want any razor related accidents.
- A bread knife. Once you have achieved the perfect loaf you don’t want to ruin it by cutting into it with a blunt knife and squashing your loaf in the process. I have a Wusthof, which is a great knife that Rich bought me for my birthday as it is quite an investment. I also have my eye on an Opinel for a future Christmas present, which is a bit more reasonably priced but still an investment.
- A temperature probe is also a very handy device to have in the kitchen generally. For bread, it helps to confirm that your loaf is cooked. If it looks a good colour, sounds hollow when you knock it and it reaches 90 degrees Centigrade then you can be sure your loaf is cooked.
- An apron. You will get dough all over you, it is inevitable. Treat yourself to one of mine, hand stamped by own fair hand.